Category Archives: Pickling and Preserving

Sweetness and Thorns

It’s that time of year again…  Heading towards the warmest months of summer when the sweetest berries ripen.  And in this hottest time of the year, it also brings us back around to canning time.  Come January I’ll be trying to invent things that will heat up the kitchen like canning does, but in July and August… in our house without air conditioning… making jams and other preserves makes the house feel something like an Amazonian rain forest.  Only the love of jam, the availability of free (when you know where to harvest the wild thing, or have your own bushes) berries, and the desire to actually be able to pronounce the ingredients in your food would lead to such folly.  In short, I love it.  😉

20140725_110030

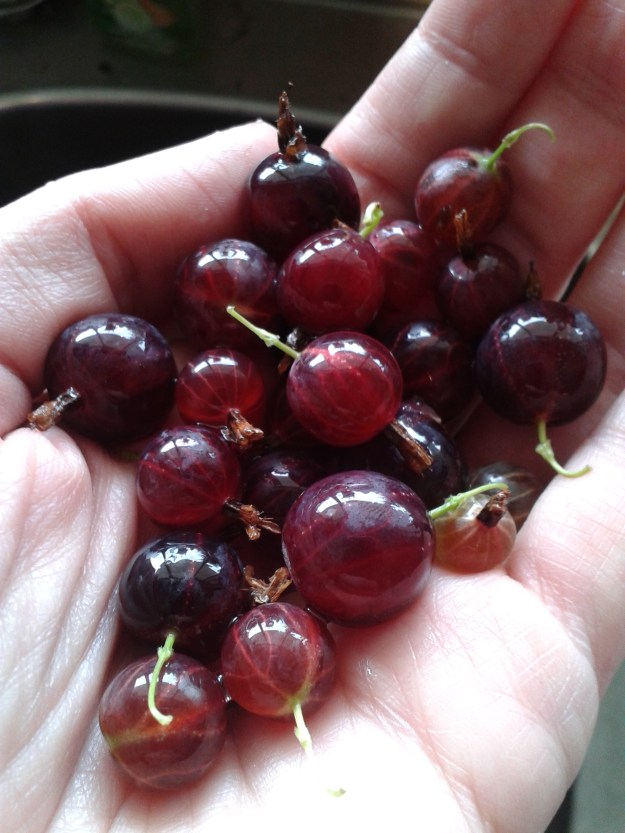
Gooseberries are some of the most beautiful berries ever.  They look jewel-like and the resulting jam… worth every single thorn.

20140725_141835

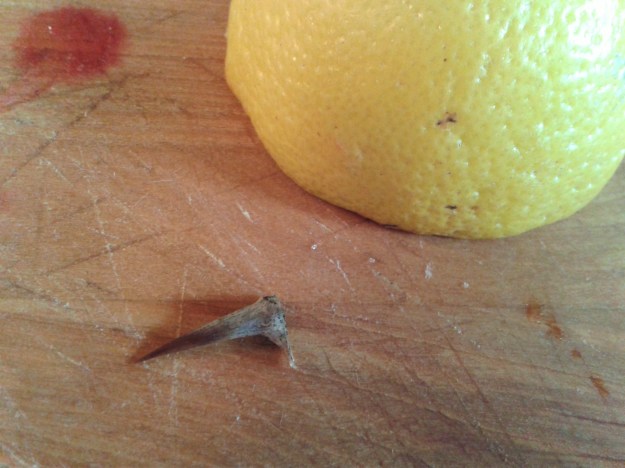
I left the lemon half in the shot to give a sense of scale, but man… these little buggers can leave a mark.

Now my favorite berries, blackberries and blueberries, will not be ready for harvest for a couple more months.  The harvest season that is soon upon us, however, is that for the gooseberry.  This is not Dave’s favorite berry.  He likes the jam well enough, but this delicious jam comes at a prince, and a bloody price at that.  This rather innocent looking bush is studded with profoundly sharp thorns to protect its delicious produce.  These are not like the puny thorns that snag you from blackberry bushes, but gooseberry thorns are more like mini daggers that sink into your skin and will not let go.  Last year Dave was in Belgium on fieldwork when the gooseberries came ripe so it was only myself and Little Man to gather our berries.  He says it was academic work.  I think it was to avoid the gooseberries.

IMG_0010

Little Man was my gooseberry helper last year.  He brought one of his superhero action figures and played in the dirt, tossing in a few berries here and there.  His favorite part was dumping my “picking bucket” into the larger berry bowl.  Kids can help in lots of ways.

Besides the issue of harvesting the gooseberries, the berries will need to be stemmed and tailed.  This can be tedious, but I have found that doing this with a friend (or my husband) along with a nice cold beer (or maybe two, but remember you need to keep your wits about you if you are making the jam right after preparing the berries) makes the process a lot nicer.  If that does not help, just keep reminding yourself how amazing this jam tastes.  You truly cannot buy this flavor from the store.

20140725_110004

Removing the stems, tails and leaves from freshly picked gooseberries can be tedious.  Grab a friend and a favorite beverage and make the chore into something fun.

Making Gooseberry Jam
Ingredients

4 cups of gooseberries (stemmed and tailed)
1 ¼ cup water
1 lemon, juiced
4 cups sugar

Directions

  1. Prepare your canner, jars, lids and rings. Place a couple of small ceramic dishes in the freezer.  You will use these to test your jam’s doneness later.
  2. In a large stock pot or Dutch oven combine half of the berries, lemon juice and water. Bring the pot to a boil and cook the berries for 10 minutes.  Some of the berries will start to pop and the liquid will turn garnet red.
  3. Add the rest of the berries and the sugar to the pot and stir over gentle heat (about 10-15 minutes) until the sugar dissolves completely. Do not rush this part or the sugar can crystallize (aka bad mojo for jam).  Once the sugar grains are all dissolved bring the berries and sugar to a full, hard boil that cannot be stirred down.  Stir often for about 10-15 minutes with a long handled wooden spoon to ensure the jam does not stick or burn.
  4. To see if the jam has set, remove one of the chilled plates from the freezer and drizzle a little bit of the hot jam mixture onto the plate. Then tilt the plate to let the jam run.  If the jam firms up quickly and sort of crinkles on the top, then it is done.  If it does not firm up quickly, then let it continue to boil hard for a couple more minutes and test it again.  Keep going until you get the crinkles, then you are ready to fill.
  5. Once the jam is firming up well, remove it from the heat and skim off any foam. This can be set aside in a bowl to add to a nice piece of toast to celebrate your hard work.
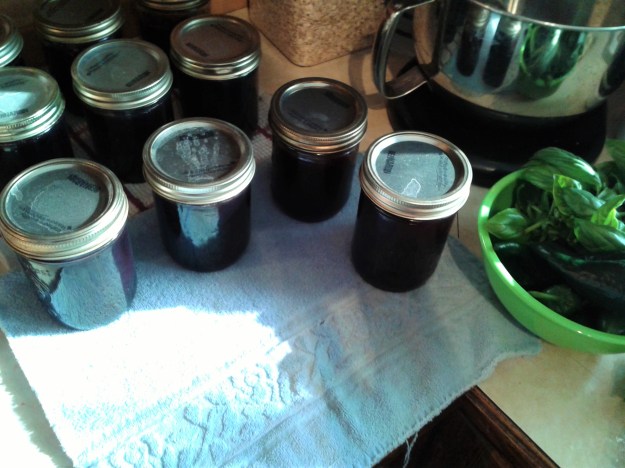
  6. Fill and process your jars based on the manufacturer’s directions. I like to use wide mouthed 250 ml jars.
  7. After the jars are processed, set them aside to cool for 24 hours. Resist the urge to touch or move them during this time.  If any lids don’t seal properly, simply put those jars into the refrigerator and enjoy over the next couple of days.  The sealed jars can be stored for up to one year.

    Click here for a printable version of the Gooseberry Jam recipe.

  8. After the jars are cooled, clean them off and remove the rings. Label your jars clearly with the name of their contents and the date they were sealed.  Store the jars in a single layer in a dark, cool area.  Do not stack your jars on top of one another.  The reason you remove the rings is that if something went wrong with the canning and bad stuff is growing in there, the lid will lose its seal and pop open.  This food should be discarded and not eaten.  If you keep the rings on or stack something on top of your jars, then you cannot tell if a seal has popped.

20140725_182127

Gooseberry

The innocent little bush, just waiting for this years victims… I mean berry pickers…

Oh, for the love of garlic

Up until a few weeks ago if you had mentioned the words “low FODMAP” to me, I would likely have thought that I’d misheard you or that perhaps you were referring to some form of low weather pressure zone.  Maybe that’s what’s been dropping all that snow back east?  Alas, no.  It is something far more troublesome…  a huge dietary change.

For over a year now we’ve been struggling to figure out some dietary issues for Little Man.  After a year of tests and tweaks and a complete lack of progress our pediatric dietician suggested that we might want to try a low FODMAP diet to see if that helps.  Let me state right from the beginning that I am not a low FODMAP specialist, and everything that I’ve read states that you should never start a low FODMAP diet without first consulting your doctor.  This is not a weight loss or fad diet, it’s a change in the way of eating for people who struggle with IBS, Celiac disease, or other gastric issues.  In short, this whole thing revolves around the fact that there are certain foods that contain short chain sugars (FODMAP is an abbreviation for the scientific names of these foods, and can be checked out online for specifics) that when they get to the gut can ferment and create unfortunate symptoms in some people.

When the dietician first mentioned the low FODMAP diet to us, I was interested… until she mentioned that two of the high FODMAP foods that we would have to give up were garlic and onion.  Seriously?  How does one live, let alone cook, without garlic and onion?  So I pushed the low FODMAP diet out of my mind and acted like it didn’t exist… until Little Man was still not healthy and nothing seemed to help.  So on board we got, and thus began our saga of a dairy-free, wheat/barley/rye free, garlic and onion free, etc-free diet.  Sigh…  For 6-8 weeks we need to stick this out hard core, then after that we should be able to start one by one reintroducing restricted foods, seeing what does or does not react negatively, and keep on going.  And, yes, I do know that low-lactose foods are allowed on the low FODMAP diet.  Unfortunately Little Man reacts badly to those, so they are persona non grata (or victus non grata?) to us at this time.  Heavy sigh…

With the print out of “foods to be avoided” in hand, I went through our pantry, fridge and freezer with a vengeance.  Shelf stable foods that we could no longer eat were given to a local food bank, while the perishables were “donated” to the pigs.  The pigs, by the way, are huge fans of this and welcome any such donations.  Then I made dinner, and while the flavor was fine, overall the food just tasted bland.  I wasn’t sure what to do to replace garlic and onion since it was banned in all forms, fresh or dried.

Since then I’ve learned a couple of tricks to add the lacking depth of flavor to our garlic-less and onion-less meals.  The first thing I did was to use more spice in just about everything.  While I cannot use garlic or onion powder, I’ve been digging deep into my stores of cumin, coriander, paprika, and just about anything else I can get my hands on. I’ve also been using colored peppers with reckless abandon.  Normally I don’t splurge for those in the produce aisle, but in times such as these I’ve been looking for more flavors to add and some brightness to the dishes.  The colored peppers fit the bill nicely, and as soon as the weather warms up a bit out here I’ll be planting some in our garden.

Another trick that I’ve been using is garlic-infused olive oil.  While garlic itself (dried or fresh) is to be avoided (sob!), you are allowed to use garlic infused oil.  For the first couple of tries, I would heat a little bit of oil in a pan and toss in a whole peeled clove.  Once the clove browned, I would remove it and proceed as normal.  Would I toss out that lovely browned clove?  As Pete the Cat would say, goodness no!  This was sliced up and given as a treat to Dave and myself since we are not fodMAP restricted.  While Little Man didn’t get the actual garlic, he did get the flavor in the meal itself.

While this infusing of oil with garlic in the pan each night allowed us to have some garlic flavor, it became cumbersome. Most nights I don’t cook with much oil at all, and it was difficult to even coat the clove with oil let alone infuse any flavor.  There’s also the fact that during the week I’m generally trying to get dinner going fast, and any steps that I can take to make dinner prep quicker are golden. Enter the glory of garlic infused olive oil.  You can, in fact, infuse any type of oil that you generally cook with, including canola, grape seed or peanut oil.  We cook mainly with olive oil, as well as using that in marinades, salad dressings, etc. so that is the oil that I chose.

A quick word of caution before we get to the recipe.  During my research into garlic infused oil, I came across a number of cautions about simply dropping raw garlic into oil and letting it sit.  This can lead to a rapid development of botulism and should not be done.  Here’s a link where they discuss this problem (Garlicster).

It should also be noted that garlic infused olive oil only has a shelf life of about one week in the refrigerator.  So if you aren’t sure that you will use two cups of olive oil over the course of one week, then simply cut the oil amount in half.  I started with the two cups of oil since I knew that there were a number of recipes that I would be making that first week that required olive oil, including a couple of salad dressings, a marinade, and a low FODMAP version of garlic bread.  If that didn’t use up the oil along with my regular cooking, then I had plans for a hummus type dip that would be amazing with that garlic infused olive oil.

Oh, for the love of garlic.

Oh, for the love of garlic.

Garlic Infused Olive Oil Recipe
This is an intensely flavored garlic infused oil specifically designed for use in cooking when you cannot use actual garlic. If you want a lighter flavored oil, simply reduce the cooking time to 5 minutes. This infused oil is great to use in vinaigrettes, to flavor pastas, make marinades, for dipping bread, or in any of your regular cooking where you would use olive oil. Just be aware that it has a relatively short shelf life of about 1 week, so only make as much as you think you will use within that time frame.

Ingredients:
1 head of garlic
2 cups of olive oil

Directions:

  1. Dismember the head of garlic, disposing of any loose, papery skins that come off. Don’t be too finicky here, since you will have plenty of garlic skin to get rid of soon.

    The dismembered head of garlic ready for bashing.

    The dismembered head of garlic ready for bashing.

  2. Place the whole garlic cloves into a small metal bowl and cover with another similarly sized bowl. The bowls must be metal; glass, ceramics and plastic are not hard enough to properly bash the garlic and will not work. It is fine if one of the metal bowls fits into the other, as long as the garlic can’t come flying out the sides.
    The reflection of the camera flash in the metal bowl makes the skins of the garlic look shiny, but they haven't been peeled yet.  That comes next...

    The reflection of the camera flash in the metal bowl makes the skins of the garlic look shiny, but they haven’t been peeled yet. That comes next…

    The bowls don't have to be the same size.  In fact, having the smaller bowl fit into the larger bowl made it easier for me to hold on to them both while I shook their skins off.  Just be sure that both bowls are metal, or this won't work.

    The bowls don’t have to be the same size. In fact, having the smaller bowl fit into the larger bowl made it easier for me to hold on to them both while I shook their skins off. Just be sure that both bowls are metal, or this won’t work.

  3. Shake the bowls hard for a good 15 seconds, then open them up to see if you need to shake them some more. This is a great task for little kitchen helpers, but gauge your child’s skill level. You know what s/he is capable of, and what could create a lovely mess. Little Man is not quite ready for this task, but he’s getting there.  After being shaken for 15 seconds or so the garlic should have bashed itself right out of the skins. If any are still clothed, simply pull off the skins, since they are likely cracked and easy to peel.
    Oh yeah...  After a good 15 seconds of shaking the cloves literally fell out of their skins.  Two weren't completely undressed yet, but I just needed to pull off the already cracked skin and they were done.

    Oh yeah… After a good 15 seconds of shaking the cloves literally fell out of their skins. Two weren’t completely undressed yet, but I just needed to pull off the already cracked skin and they were done.

    Your fingers still get a bit sticky removing the cloves from the pile of skins, but when trying to peel an entire head of garlic... I've never had it go so quickly and with so little mess.

    Your fingers still get a bit sticky removing the cloves from the pile of skins, but when trying to peel an entire head of garlic… I’ve never had it go so quickly and with so little mess.

  4. Cut the cloves in half the long way and place them in a small sauce pan, just large enough to hold them and 2 cups of olive oil. Pour the olive oil over the sliced cloves and heat the mixture over medium heat until it just starts to bubble. Cook the garlic in the oil for 10 minutes. If the garlic begins to brown quickly, carefully remove the pan from the heat and let it cool briefly before returning it to the stove. Monitor it regularly to make sure nothing is burning. After 10 minutes carefully remove the pan from the heat, cover it and let the garlic steep in the oil for one hour.
    I halved the garlic cloves since I greedily want as much garlic flavor in the oil as I can.  If you want a milder flavor, then omit that step.

    I halved the garlic cloves since I greedily want as much garlic flavor in the oil as I can. If you want a milder flavor, then omit that step.

    The garlic cloves in the bath before heating.

    The garlic cloves in the bath before heating.

    The garlic should just start to bubble in the oil over medium heat.  If it starts to brown too quickly, carefully remove it from the heat for a minute or two and then put it back on.  No burnt garlic here, please, or your whole batch will taste burnt.

    The garlic should just start to bubble in the oil over medium heat. If it starts to brown too quickly, carefully remove it from the heat for a minute or two and then put it back on. No burnt garlic here, please, or your whole batch will taste burnt.

    This is the garlic after 10 minutes simmering in the oil.  They are lightly brown all over, but still look like they have some moisture left inside.  Take them off the heat, cover them, and let them steep.

    This is the garlic after 10 minutes simmering in the oil. They are lightly brown all over, but still look like they have some moisture left inside. Take them off the heat, cover them, and let them steep.

    This is the garlic after steeping in the oil and cooling to room temperature for an hour.  Most of the moisture is gone, and they've given all of their awesome garlic-iness to the oil.  Spell check doesn't like that one.

    This is the garlic after steeping in the oil and cooling to room temperature for an hour. Most of the moisture is gone, and they’ve given all of their awesome garlic-iness to the oil. Spell check doesn’t like that one.

  5. Once it has cooled to room temperature, pour the oil through a strainer into a clean glass jar with a lid. The oil can be used immediately, or it can be stored in the refrigerator in a glass jar for up to a week. If you think that you won’t use two cups of oil over the course of a week, simply cut the quantity of oil in half and make the same thing with 1 cup of oil.
    I didn't want to spill the oil as I strained it into the glass jar, so first strained it into my measuring glass that had held the olive oil for this recipe.  Then I poured from the spout of the measuring glass into my storage jar.

    I didn’t want to spill the oil as I strained it into the glass jar, so first strained it into my measuring glass that had held the olive oil for this recipe. Then I poured from the spout of the measuring glass into my storage jar.

    Lovely dessicated garlic and beautifully infused garlic olive oil.

    Lovely dessicated garlic and beautifully infused garlic olive oil.

    With a tight fitting lid this garlic infused olive oil will last for up to one week in the refrigerator.  I already have many plans for my oil, including a low FODMAP garlic bread, so stay tuned.

    With a tight fitting lid this garlic infused olive oil will last for up to one week in the refrigerator. I already have many plans for my oil, including a low FODMAP garlic bread, so stay tuned.

Click here for a printable version of the Garlic Infused Olive Oil recipe.

P.S.

Since originally writing this blog post (it sat around a bit until I could take the pictures) we have found that as restrictive as it is, the low FODMAP diet has had a tremendously positive effect on Little Man.  We are looking forward to being able to try reintroducing some of the high FODMAP foods back into his diet eventually, but for now the sacrifice of the dietary change has been well worth it.

10 Things I Learned About Pickling

I am not an expert… yet… on pickling, but here are a few nuggets that I’ve learned over my pickling this season.

Rows of Pickles1.  Be aware of where you get your cucumbers from.  We practice organic gardening, so there are no pesticides or fertilizers in our soil to be concerned about.  If you buy your cucumbers from the store that is not the case.  It’s best that if you can’t grow your own (and don’t have any desperate friends, neighbors or coworkers who have grown too many cucumbers), then try to buy your pickling cucumbers from the farmers’ market or local farm stand. Be sure to ask about how the cukes are grown (specifically for pesticides, etc.), since anything that is one the skin of your cucumbers will end up on your pickles.  Even aside from the pesticide issue, most supermarket cucumbers are either slick with waxes or so expensive that it makes pickling seem like a waste of money.

2. If you want crisp pickles, whole or sliced, include a small, fresh grape leaf in the bottom of each jar.  I first read about this from Alice Waters, but have come across it multiple times.  Apparently grape leaves contain alum, which will help your pickles stay crisp when processed.

Grape leaves for keeping pickles crisp.

Grape leaves for keeping pickles crisp.

3.  Always trim off about 1/8 of an inch at each end of the cucumbers (whether for whole or sliced pickles).  The blossom end of the cucumbers contain an enzyme that keeps your pickles from staying crisp, so you definitely want to remove that.
20140730_133826

4.  Pickles are fun to make, and feel a bit more like potion brewing than preserving.  You can be creative with your blend of spices, since pickles can be pretty forgiving.  And if you’re not free to experiment, where’s the fun in pickling.

5. If you are experimenting with different spices in your pickles, use a light hand.  The first batch I made were so heavy in spice that it gave the pickles a slightly weird taste, and in effect wasted a ton of spice.  A little goes a long way.
20140801_014056

6.  Always wear latex gloves when packing the hot jars with vegetables for pickling.  They protect your hands a bit from the heat.

7.  When pickling (or doing other types of preserving) don’t answer the phone, the door, or a plaintive dog wanting to go in or out.  Choose a time when your kids won’t be needing your attention, or you can otherwise stay focused.  You’re dealing with hot substances and you want to be focused and uninterrupted.
20140730_112539

8. You can be creative with the spices you use in your pickles, but don’t vary from the water, sugar or vinegar levels in the recipe.  Those are tested to preserve your foods the best.

9.  Never ever tell someone that you are interested in trying pickling things (especially if they have a garden), unless you want to be inundated with enough fresh produce to feed a small army.

A big pile of cucumbers waiting to be pickles.

A big pile of cucumbers waiting to be pickles.

10.  Your own homemade pickles taste better than anything you’ve ever had in the stores.  But that may just be because of the energy you put into making them.  🙂

20140730_112648

The Tyranny of Cucumbers

“Did you ever think in your life that you would have made so many pickles?”

Dave recently asked me this at 1am in the morning as we were wrapping up a marathon pickling session.  I gave one of those chuckles that comes from pure exhaustion and set the timer for the processing of the last four jars of cured pickles.  The answer to Dave’s question was a resounding “no” not in a million years would I have ever thought that I’d have made any pickles, forget about the 40 some odd liters… yes liters… of pickles I’d made over the last few weeks.

When the lady farmer landlord asked if I’d be interested in making pickles, I’d jumped at the chance.  Almost literally.  Then I realized how many cucumbers one healthy plant can produce, forget about the fact that the cucumber bed at the farm has 7-8 hills of cucumbers, each hill housing 2-3 vines.  Oh my…

If you’ve ever seen cucumbers grow, you would know that they are ninja vegetables.  Their camouflage is so perfect they put invisibility cloaks to shame.  The lady farmer landlord and myself and Dave and Little Man would comb over a vine, plucking any cucumbers we would find.  Little Man’s contribution is a bit quesitonable here.  It mainly consists of him dropping an action figure into the plant accompanied by much “argh, I’m faaaaaalllllliiiing…” and then demands that his figure be saved.  We would pick it all, from the tiny pinky finge- sized cukes to the fat field cucumbers that are too big to be whole pickes, but would make good relish or pickle slices.  I state that all 3-4 of us were combing through each fine, picking everything, and 15 minutes later we’d see the vine from a different angle and find 3 more cukes hiding there.  Then the next morning when I’d be watering the garden I’d see more smirking at me from under the leaves.

We’ve now put a kaybash on picking cucumbers for pickling.  Anything else can be done with them, eat them raw with a little vinegar, make a delicious cold soup or dip (for a cold cucumber yogurt soup, check out my Turkish Cucumber and Yogurt Soup (aka Cacik) recipe), slice them with fresh tomatoes and drizzle them with a little olive oil and balsalmic vinegar for a sliced salad, and the list goes on.  You can make jewelry with them for all I care, just don’t ask me to make more pickles…  please…  🙂

Grape leaves for keeping pickles crisp.

Grape leaves for keeping pickles crisp.

Kosher-Style Dill Pickles

One of the biggest hurdles to deal with in making pickles is how to keep something submerged in water crisp.  One way is to use a fresh grape leaf in each jar.  Grape leaves contain alum, which helps to keep the pickles crisp.  Also, the blossom end of the cucumbers contains and enzyme that softens pickles.  So trim off a little of both ends of the cucumbers to make sure that those enzymes are removed.  Now get pickling!

Ingredients
8 lbs. small pickling cucumbers (such as Kirby)
1 cup pickling or kosher salt
3 tbsp. pickling spice
9 cups water
7 ¾ cups white vinegar
7 small, fresh grape leaves
7 bay leaves
7 garlic cloves, peeled and halved
7 dill sprigs and heads, halved

Directions

  1. Wash and scrub the cucumbers under running water. Trim 1/8th of an inch off of both ends of every cucumber, and then poke them all over with a fork.
    A big pile of cucumbers waiting to be pickles.

    A big pile of cucumbers waiting to be pickles.

    Poking holes to aid in curing the cucumbers.

    Poking holes to aid in curing the cucumbers.

  2. In a large, non-reactive bowl create four layers of cucumbers each one topped with ¼ cup of the kosher salt. Once the layers are completed, fill the bowl with cold water to submerge the cucumbers by ¼ inch. Use a plate to weigh down the cucumbers, and let them sit for 12 to 24 hours.
    A first layer of cucumbers.

    A first layer of cucumbers.

    A layer of kosher salt.

    A layer of kosher salt.

    The final of four layers of cucumbers and salt.

    The final of four layers of cucumbers and salt.

    The cured cucumbers after soaking in the salted water for 24 hours.

    The cured cucumbers after soaking in the salted water for 24 hours.

  3. Prepare your canner (or large stock pot), jars and lids.
  4. Drain, rinse and drain the cucumbers again.
  5. Wrap the pickling spice in a double thickness of cheese cloth and tie it securely. In a large pot combine the packet of pickling spice, water and vinegar. Bring the mixture to a boil and continue at a hard boil for one minute. Discard the packet of pickling spice, and keep the brine hot.
  6. Working with one jar at a time place one grape leaf, one bay leaf, one half of a garlic clove, and one half of a dill head at the bottom of the jar. Pack the jar tightly with cucumbers. Place one half of a garlic clove and one half of a dill head on top of the cucumbers. Pour in the hot pickling liquid leaving ½ inch head space. Remove air bubbles and add more pickling liquid if necessary. Wipe the rim and place a hot lid disk on the jar. Skrew down the band to fingertip-tight.
  7. Place jars in the canner and return to a boil. Process for 15 minutes. Turn off the heat, remove the canner lid and let the jars sit in the hot water for another 5 minutes. Carefully remove the jars from the hot water and place them without tipping on a towel-lined counter top. Let the jars stand for 24 hours, then check the lids to be sure they are all sealed. Any jar that is not sealed can be stored in the refrigerator for up to three weeks. Jars with good seals can be cleaned and stored. If any pickles protrude above the brine in their jars, simply turn the jars over weekly in storage to keep the different ends from drying out. Enjoy!
    20140731_155425

Click here for a printable version of the Kosher Style Dill Pickles recipe.