Category Archives: Vegetarian/Vegan

Breakfast Snack Cookies

Somewhere along the way we developed a morning routine of Little Man waking up and heading to the couch for a little TV, a drink of juice and a snack to tide him over until breakfast.  I don’t mind this window of quiet since it buys us a bit of time to start moving (and thinking).  Neither Dave nor I are particularly quick or quick witted first thing. What I’ve tried to do for these morning snacks, is find something that still registers as a treat for him, but that I can feel good about giving him to eat.  For Little Man, the greatest treat in the world is a cookie so treats in that form are generally a big hit.  Then I just wanted to make one that was as choc full of goodness (and tastiness) as I could come up with.  Enter the Oatmeal Peanut Butter Snack Cookie.

Once you move beyond the fact that they are delicious, they are also wheat-free, vegan and low FODMAP compliant, though none of those labels sound particularly tasty.  So if you’re going just for taste, ignore those last few disclaimers and get ready for a deliciously chewy cookie that you can feel good about feeding your family for breakfast or snack… or for treating yourself to as well.

With these, or pretty much any kind of cookies, I like to bake off a dozen right away for snacking and then freeze the rest in logs for slice and bake cookies.  For one thing that keeps me from eating an entire plate of cookies immediately since I don’t have a massive pile of cookies in front of me, but it also lets me vary things for Little Man in the mornings for snack time.  One of the things I read while researching Little Man’s dietary issues, is that especially if you have a picky eater, you should never serve your child the same thing two days in a row for breakfast.  Since Little Man is a picky eater and has the dietary issues, it felt like we were only feeding him two different foods for breakfast.  So now I try to have 4-5 breakfasts that I cycle through on any given week.  For us that’s often pancakes, eggs/toast/bacon, waffles, baked oatmeal, french toast, and a Dutch apple baby (baked pancake).  This is also why I like to keep homemade frozen pancakes, waffles, and bread in my freezer.  I make a batch of something and then freeze a good amount of it for use later in the week.  It’s not a perfect system, but it lets me rotate things through for Little Man and hopefully keeps his taste buds ready for new things to try.  FIngers crossed…

Oatmeal Peanut Butter Snack Cookies
I love that I can give these cookies to my son without feeling guilty about the ingredients, and the fact that he loves them because they’re delicious. Loaded with oats and peanut butter, these cookies give a good boost of fiber and protein, as well as a bit of chia goodness to round things out. I like to bake off a dozen and then freeze the rest of the dough in logs so I can bake more  whenever I want. Just add 5 minutes to the baking time if baking from frozen.

Ingredients:
2 tsp. chia meal (see note*)
2 tbsp. water (plus ½ cup for use later on)
¼ cup margarine, softened
1 cup creamy peanut butter
½ cup brown sugar
1 tsp. vanilla extract
3 cups rolled oats (not instant)
1 ¼ tsp. baking soda
1 cup semisweet chocolate chips

Directions:

  1. Preheat your oven to 350°, and line a baking sheet with parchment paper.
  2. In a small bowl combine the chia meal and the water, and let it sit for 5 minutes. This becomes your chia egg (aka egg replacement).
    IMG_3923

    All you need to make your own chia meal is a bag of chia seeds and a coffee/spice grinder.  This lets you create a healthier chia meal since your freshly ground meal retains more of the essential oils.  Store bought chia meal is much older and the oils have started to dissipate.

    IMG_3926

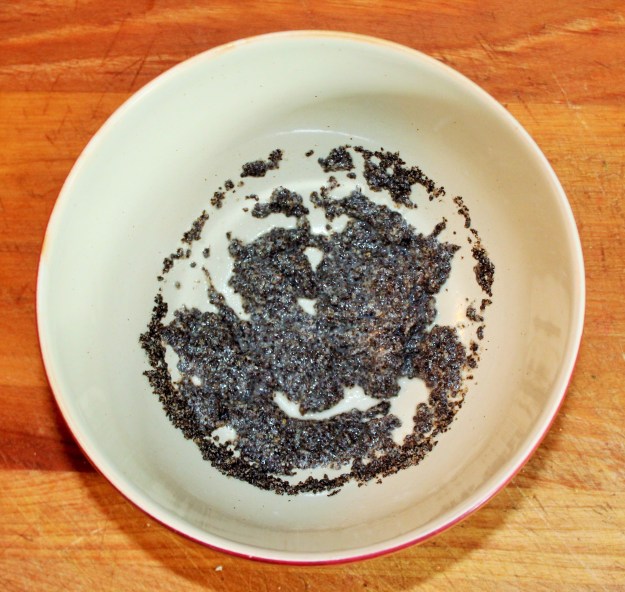
    It may not be pretty, but this peppery-gray goo (aka egg replacer) is full of nutrients, and helps wheat-free recipes hold together.

  3. In a large bowl or stand mixer, beat the margarine and peanut butter until fluffy. Add the chia egg, brown sugar and vanilla and beat until combined.
    IMG_3927

    Getting the margarine and peanut butter ready.  I use a good quality soy-free margarine.

    IMG_3928

    The beaters make fast work of blending my ingredients together, but you can do this by hand or with a stand mixer depending on your “tool” of choice.

    IMG_3930

    These are the last ingredients for using the beaters (or stand mixer).  From here on out you will want to use a spoon to combine the remaining ingredients.

    IMG_3931

    And here is your lovely batter, ready for the best parts… the oats and chocolate chips.

  4. Add the water, oats and baking soda, stirring by hand with a spoon or mixing on a lower speed in a stand mixer so the oats do not get too broken up.
    IMG_3933 (2)

    I like to stir this part by hand with a spoon so the oats do not get too broken up.

    IMG_3935

    Just missing the chocolate.

  5. Stir in the chocolate chips, and use two spoons to portion and drop tablespoon sized dough balls onto the parchment lined baking sheet, about 2 inches apart.
    IMG_3939

    This is Little Man’s favorite part since he needs to play Quality Inspector and make sure that the chocolate is fit for people to eat.

    IMG_3941

    Since this is an egg-free batter, the raw dough is safe for snacking on.  Little Man is not generally lucky enough for this, however, since I like to keep as much batter for cookies as possible.

    IMG_3943

    I did not use a scoop to form these cookies, just the old-fashioned method of two teaspoons.  If you do use a scoop, press down on the center a bit to flatten the cookies so that they cook through well.  This batter does not spread like some others do.

    IMG_3945

    More cookie love.

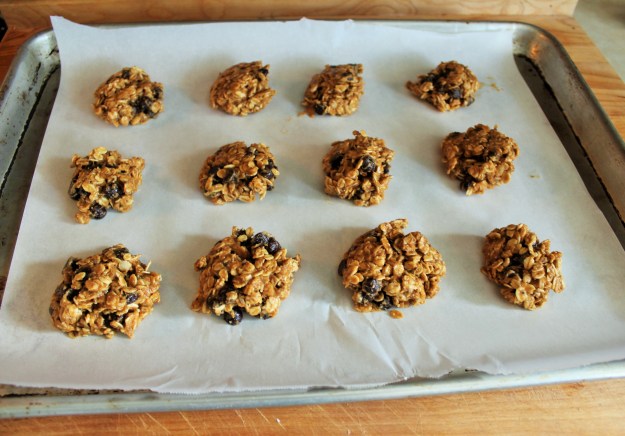
  6. Bake the cookies for 10 minutes, then allow to cool on the baking sheet for five minutes. Remove the cookies to a cooling rack and cool completely (of course, you should munch on a couple while they are still warm… just to make sure they are good). These cookies tend to be more fragile than cookies with lots of flour, but their taste makes up for any potential fragility.

    IMG_3955

    Since there is no flour in this recipe the cookies can be a bit fragile.  Let them sit on the tray for 5 minutes before transferring them to a rack to cool completely.

  7. The dough can also be rolled into a log inside plastic wrap and frozen for slice and bake cookies. When you want the cookies, simply pull out a log, unwrap the portion you want, slice off cookies and place them on a parchment paper lined baking sheet. Bake at 350° and check after 10 minutes. They may need a couple of minutes more since they are baking from frozen. Enjoy!
    IMG_3946

    I like to bake off a dozen of the cookies fresh, and then save the rest of the batter as freezer rolls to bake whenever I want them. So start with a sheet of plastic wrap and dump a portion of the batter onto the center of the plastic.

    IMG_3947

    Form the batter into a log-like shape using the sides of the plastic.

    IMG_3950

    Don’t feel that you have to be too precious about the thing and roll the perfect log.  No one is looking, so if your cookie log isn’t perfect it is no big deal.  And if anyone wants to critique your cookie log shape… perhaps they are not worthy of your cookies.  Just a thought.  😉

    IMG_3953

    Sometimes the cookie logs do not last long enough in the fridge or freezer for me to label them.

    IMG_3955

    The finished beauties.

IMG_3957 (2)

Now I just need a cup of tea and I will declare it snack time.


Note
: Chia seeds lose their awesome oils quickly once ground, so try not to buy them pre-ground as chia meal. Make your own chia meal by blitzing up chia seeds in a coffee grinder or food processor. You can also do the same with flax seeds, or make oat flour by blitzing up whole oats (not instant, please). Store any extra chia meal in the freezer to keep it fresh.

Click here for a printable version of the Oatmeal Peanut Butter Snack Cookies recipe.

Adventures with FODMAPs – Polyols and Sweet Potato “Fries”

We’ve finally made it through the initial eight weeks of the FODMAP diet so we can begin trying to reintroduce different categories of FODMAPs into Little Man’s and our diets.  Whew!  It’s been a bit of a haul, and honestly it’s likely been closer to 10 weeks because we completely botched the first week or two.  After that point we got into the swing of things and started seeing really great improvements in Little Man’s health.  Now we get to start trying out foods, one category at a time, checking for reactions to each one, slowly going through multiple foods from each category before moving on.  Let the games begin…

For more specifics on the FODMAP diet and reintroducing foods, please see Sue Shepard’s Complete FODMAP Diet book.  This details the tests they ran to create the diet, the types of issues that following the diet can help, a detailed discussion of FODMAPS, foods to avoid and how to reintroduce foods for these “challenges” to see what reacts badly with an individual and what can be safely eaten.  I do not attempt to be an expert on this diet, but simply am doing my best to follow the guidelines to help my family’s health.

Shepard recommends starting the reintroductions with the Polyol FODMAP category, moving slowly through up the scale of contentious other categories, and finally ending with the one that no one can actually digest well… Galactoids (aka beans… but more on those in a few weeks).  Polyols are “sugar alcohols” and occur naturally in some foods, but are also used in processed foods as sweeteners.  For us, the high FODMAP polyols that we used as “challenges” to reintroduce to Little Man are apples, blackberries, pears, and mushrooms, as well as the moderate polyol FODMAPs of sweet potatoes and avocados.  Even though this was the least contentious of the categories to start with, it is one that I’ve been looking to forward the most because of its prevalence as a sweetener in juices, cookies, granola bars, fruit snacks, jams, and any other myriad of snack treat or food aimed towards kids.  Try finding jams, juices or fruit snacks for kids that don’t contain either high fructose corn syrup (another high FODMAP, but one that we try to eliminate anyway) or some form of apple.  Ugh…

Starting the reintroduction process has been nerve wracking.  Little Man’s tummy was looking good and it’s difficult to put that at risk, but I’m also excited to start this process so that we can (hopefully) finally know what his triggers are.  My hope is that it will be easier to only have to avoid a few triggers (please be only a few!) than the world at large.

For the reintroduction process, it’s important to not completely gorge on the food you are testing, but also to make sure that you eat a good portion. If you try too small of an amount, you may not get an accurate response.  So you should try a regular-sized portion (Shepard has suggestions), see if there is a reaction, and then try again.  If you have a regular sized proportion of a high FODMAP food and have a reaction, Shepard suggests that after your symptoms subside try the food again at a smaller amount.  It might just be that you can only tolerate a small bit.  Once you know what foods and what amounts of the foods you can (or cannot) handle, you can start to better understanding your triggers.  Shepard also suggests trying these trigger foods again at a later date.  Sometimes our systems change, and especially since Little Man is so young he may out grow (or may not) the unfortunate reactions he’s experiencing today.

It took us almost two weeks, but we just completed testing the Polyol FODMAP food group.  Luckily for us, Little Man did great with all of the polyols we tried.  He did so good, in fact, that for the first time in months I let him have one of the good fruit snack treats (sweetened with apple juice) we call fruit straws.  He was ecstatic, and so far I haven’t seen any bad reactions.  To celebrate this “challenge” Little Man and I ate our fruit snacks while going on an adventure walk in our neighbors’ Enchanted Forest.  Aside from the fruit straws, we were also treated to our first view of a native orchid species to these woods called Fairy Slippers.  The orchids are tiny, so it took us a bit of time to finally locate the amidst the larger Trilium and gorgeous yellow violets. Little Man, who is obsessed with all things Kung Fu Panda, was determined that we were having a hard time finding the Fairy Slipper orchids because a group of Croc bandits must have come through and taken them all.  Luckily we chased off the Croc bandits and found the orchids.  Whew!

Aside from apple, one of the polyol foods that I have been looking forward to “testing” are sweet potatoes.  We are still struggling with getting Little Man to eat vegetables (and fruit in any form that is not completely pulverized or turned into jam), but one that he will eat without any question is a sweet potato.  In our household we call these “french fries” even though they aren’t fried, aren’t made from regular potatoes (though you can use them if you want), nor are they in french fry shape (though you can easily cut them that way too).  Ah well.  The good news is that since Little Man has cleared this challenge, we can start enjoying sweet potatoes again at dinner time. Little Man’s favorite way to eat sweet potato “french fries” is in the form of Oven Roasted Sweet Potato Fries.  For the reintroduction celebration of sweet potatoes, I served them as Smokey Sweet Potato Bites.  I’ve included both recipes here, though the pictures are only for the Smokey Sweet Potato bites since the method is the same.  When we put these on the dinner table Little Man’s eyes lit up and he literally fell on them with both hands.  Dave and I were concerned that he was going to eat too many of them and therefore have a bad reaction, but all was well with the world and Little Man was super excited to have one of his favorite foods back.  Whew!

If you think that you don’t like sweet potatoes, maybe give them one more chance and try these out.  The cost and labor output is low, and you might be surprised by actually liking them.  I, myself, only like sweet potatoes in certain dishes.  I’m not a huge fan of baked sweet potatoes served like regular baked potatoes, nor do I like sweet potato fries especially if they are treated like a dessert and covered in cinnamon sugar.  Apologies to all of those sweet potato lovers who like those two dishes, but they simply aren’t my thing.  My classic Oven Roasted Sweet Potato “Fries” and Smokey Sweet Potato Bites, however, are totally different.  The sweetness of the sweet potato is balanced with the smokey spices, and the edges of each bite are crisped in the oven.  What’s not to like?  Here’s how they are made.

Oven Roasted Sweet Potato “Fries”
In our household, these are the classic form of “French fry” that appear on our dinner table regularly. They aren’t fried, nor are they made out of potatoes, nor are they in French fry shape (though you can easily cut them that way). What they are is delicious, and Little Man’s favorite vegetable. If you don’t think you like sweet potatoes, give these a shot. You might just change your mind.

Ingredients:
2 medium sweet potatoes
¼ cup olive oil, plus extra
Salt and pepper to taste

Directions:

  1. Preheat your oven to 400°. Prepare a baking sheet by drizzling a little olive oil over it, then spreading the oil around with your fingers to evenly cover the pan. Set it aside.
  2. Peel the sweet potatoes, and then cut them in half the long way. Then cut those halves in half the long way again. Line up your sweet potato quarters and slice them into ¼ inch “bites.” Try to keep the pieces close to the same thickness, otherwise the really skinny ones will burn before the thicker ones crisp. Once all of your sweet potatoes are chopped, place them in a large bowl.
  3. Add the rest of the ingredients to the bowl and toss with a large spoon until the sweet potato bites are evenly coated.
  4. Pour the seasoned sweet potatoes out onto the prepared baking sheet. Be sure that your sweet potatoes are all in one layer, spreading them out if needed.
  5. Bake for 30 minutes, checking the “fries” towards the end of the cooking time to ensure that they aren’t “over caramelizing.” If they are getting too dark at the corners of your baking sheet, simply flip them around with a spatula moving the darker pieces into the center and the less done pieces to the corners.
  6. Once the fries are crispy and browned, remove the pan from the oven and move the bites with a spatula into your serving bowl. Taste for seasoning, adjusting if necessary. Enjoy!

Click here for a printable version of my Oven Roasted Sweet Potato “Fries” recipe, and keep on reading for another variation (this time with pictures!).

Smokey Sweet Potato Bites

Smokey Sweet Potato Bites
These are a smoky, spiced version of the classic Oven Roasted Sweet Potato Fries that Little Man loves. That basic recipe can be a blank canvas to season with whatever spices and herbs you are feeling inspired by. I love the smokey paprika with these fries, and they pair fantastically with roasted chicken or pork, or with any hearty vegetarian main. Like with the classic version, if you don’t think you like sweet potatoes, give these a shot.

Ingredients:
2 medium sweet potatoes
¼ cup olive oil, plus extra
2 tsp. ground cumin
2 tsp. ground coriander
2 tsp. smoked paprika
Salt and pepper to taste

Directions:

  1. Preheat your oven to 400°. Prepare a baking sheet by drizzling a little olive oil over it, then spreading the oil around with your fingers to evenly cover the pan. Set it aside.
  2. Peel the sweet potatoes, and then cut them in half the long way. Then cut those halves in half the long way again. Line up your sweet potato quarters and slice them into ¼ inch “bites.” Try to keep the pieces close to the same thickness, otherwise the really skinny ones will burn before the thicker ones crisp. Once all of your sweet potatoes are chopped, place them in a large bowl.
    I included this picture to let you know the approximate size that I tend to buy of sweet potatoes.  I generally avoid the ones that are closer to small comet size.

    I included this picture to let you know the approximate size that I tend to buy of sweet potatoes. I generally avoid the ones that are closer to small comet size.

    The look after being peeled...

    The look after being peeled…

    Halving them lengthwise...

    Halving them lengthwise…

    Then halve them lengthwise again, and slice into little arcs.  These are perfect bite size (or for little fists...) bites.

    Then halve them lengthwise again, and slice into little arcs. These are perfect bite size (or for little fists…) bites.

  3. Add the rest of the ingredients to the bowl and toss with a large spoon until the sweet potato bites are evenly coated with the oil and spices.
    Adding the spices to the bowl.  I love smoked paprika.  Look at that color!

    Adding the spices to the bowl. I love smoked paprika. Look at that color!

    Evenly tossed raw sweet potato bites with spices and olive oil.

    Evenly tossed raw sweet potato bites with spices and olive oil.

  4. Pour the seasoned sweet potatoes out onto the prepared baking sheet. Be sure that your sweet potatoes are all in one layer, spreading them out if needed.
    Pouring the bites onto a prepared baking sheet.

    Pouring the bites onto a prepared baking sheet.

    Smooth out the pile so that each bite can get nice and crispy in the oven.

    Smooth out the pile so that each bite can get nice and crispy in the oven.

  5. Bake for 30 minutes, checking the sweet potato bites towards the end of the cooking time to ensure that they aren’t “over caramelizing.” If they are getting too dark at the corners of your baking sheet, simply flip them around with a spatula moving the more done pieces into the center and the less done pieces to the corners.
    These are about halfway done.  Flip them here so that both sides get golden brown, and if any on the edges are browning too quickly you can move them to the center.

    These are about halfway done. Flip them here so that both sides get golden brown, and if any on the edges are browning too quickly you can move them to the center.

    Here they are almost perfect.  You can taste them now to adjust for seasoning.

    Here they are almost perfect. You can taste them now to adjust for seasoning.

  6. Once the sweet potato bites are crispy and browned, remove the pan from the oven and move the bites with a spatula into your serving bowl. Taste for seasoning, adjusting if necessary. Enjoy!

    Smokey Sweet Potato Bites!

    Smokey Sweet Potato Bites!

Click here for a printable version of my Oven Roasted Sweet Potato “Fries” recipe or my Smokey Sweet Potato Bites recipe.

Oh, for the love of garlic

Up until a few weeks ago if you had mentioned the words “low FODMAP” to me, I would likely have thought that I’d misheard you or that perhaps you were referring to some form of low weather pressure zone.  Maybe that’s what’s been dropping all that snow back east?  Alas, no.  It is something far more troublesome…  a huge dietary change.

For over a year now we’ve been struggling to figure out some dietary issues for Little Man.  After a year of tests and tweaks and a complete lack of progress our pediatric dietician suggested that we might want to try a low FODMAP diet to see if that helps.  Let me state right from the beginning that I am not a low FODMAP specialist, and everything that I’ve read states that you should never start a low FODMAP diet without first consulting your doctor.  This is not a weight loss or fad diet, it’s a change in the way of eating for people who struggle with IBS, Celiac disease, or other gastric issues.  In short, this whole thing revolves around the fact that there are certain foods that contain short chain sugars (FODMAP is an abbreviation for the scientific names of these foods, and can be checked out online for specifics) that when they get to the gut can ferment and create unfortunate symptoms in some people.

When the dietician first mentioned the low FODMAP diet to us, I was interested… until she mentioned that two of the high FODMAP foods that we would have to give up were garlic and onion.  Seriously?  How does one live, let alone cook, without garlic and onion?  So I pushed the low FODMAP diet out of my mind and acted like it didn’t exist… until Little Man was still not healthy and nothing seemed to help.  So on board we got, and thus began our saga of a dairy-free, wheat/barley/rye free, garlic and onion free, etc-free diet.  Sigh…  For 6-8 weeks we need to stick this out hard core, then after that we should be able to start one by one reintroducing restricted foods, seeing what does or does not react negatively, and keep on going.  And, yes, I do know that low-lactose foods are allowed on the low FODMAP diet.  Unfortunately Little Man reacts badly to those, so they are persona non grata (or victus non grata?) to us at this time.  Heavy sigh…

With the print out of “foods to be avoided” in hand, I went through our pantry, fridge and freezer with a vengeance.  Shelf stable foods that we could no longer eat were given to a local food bank, while the perishables were “donated” to the pigs.  The pigs, by the way, are huge fans of this and welcome any such donations.  Then I made dinner, and while the flavor was fine, overall the food just tasted bland.  I wasn’t sure what to do to replace garlic and onion since it was banned in all forms, fresh or dried.

Since then I’ve learned a couple of tricks to add the lacking depth of flavor to our garlic-less and onion-less meals.  The first thing I did was to use more spice in just about everything.  While I cannot use garlic or onion powder, I’ve been digging deep into my stores of cumin, coriander, paprika, and just about anything else I can get my hands on. I’ve also been using colored peppers with reckless abandon.  Normally I don’t splurge for those in the produce aisle, but in times such as these I’ve been looking for more flavors to add and some brightness to the dishes.  The colored peppers fit the bill nicely, and as soon as the weather warms up a bit out here I’ll be planting some in our garden.

Another trick that I’ve been using is garlic-infused olive oil.  While garlic itself (dried or fresh) is to be avoided (sob!), you are allowed to use garlic infused oil.  For the first couple of tries, I would heat a little bit of oil in a pan and toss in a whole peeled clove.  Once the clove browned, I would remove it and proceed as normal.  Would I toss out that lovely browned clove?  As Pete the Cat would say, goodness no!  This was sliced up and given as a treat to Dave and myself since we are not fodMAP restricted.  While Little Man didn’t get the actual garlic, he did get the flavor in the meal itself.

While this infusing of oil with garlic in the pan each night allowed us to have some garlic flavor, it became cumbersome. Most nights I don’t cook with much oil at all, and it was difficult to even coat the clove with oil let alone infuse any flavor.  There’s also the fact that during the week I’m generally trying to get dinner going fast, and any steps that I can take to make dinner prep quicker are golden. Enter the glory of garlic infused olive oil.  You can, in fact, infuse any type of oil that you generally cook with, including canola, grape seed or peanut oil.  We cook mainly with olive oil, as well as using that in marinades, salad dressings, etc. so that is the oil that I chose.

A quick word of caution before we get to the recipe.  During my research into garlic infused oil, I came across a number of cautions about simply dropping raw garlic into oil and letting it sit.  This can lead to a rapid development of botulism and should not be done.  Here’s a link where they discuss this problem (Garlicster).

It should also be noted that garlic infused olive oil only has a shelf life of about one week in the refrigerator.  So if you aren’t sure that you will use two cups of olive oil over the course of one week, then simply cut the oil amount in half.  I started with the two cups of oil since I knew that there were a number of recipes that I would be making that first week that required olive oil, including a couple of salad dressings, a marinade, and a low FODMAP version of garlic bread.  If that didn’t use up the oil along with my regular cooking, then I had plans for a hummus type dip that would be amazing with that garlic infused olive oil.

Oh, for the love of garlic.

Oh, for the love of garlic.

Garlic Infused Olive Oil Recipe
This is an intensely flavored garlic infused oil specifically designed for use in cooking when you cannot use actual garlic. If you want a lighter flavored oil, simply reduce the cooking time to 5 minutes. This infused oil is great to use in vinaigrettes, to flavor pastas, make marinades, for dipping bread, or in any of your regular cooking where you would use olive oil. Just be aware that it has a relatively short shelf life of about 1 week, so only make as much as you think you will use within that time frame.

Ingredients:
1 head of garlic
2 cups of olive oil

Directions:

  1. Dismember the head of garlic, disposing of any loose, papery skins that come off. Don’t be too finicky here, since you will have plenty of garlic skin to get rid of soon.

    The dismembered head of garlic ready for bashing.

    The dismembered head of garlic ready for bashing.

  2. Place the whole garlic cloves into a small metal bowl and cover with another similarly sized bowl. The bowls must be metal; glass, ceramics and plastic are not hard enough to properly bash the garlic and will not work. It is fine if one of the metal bowls fits into the other, as long as the garlic can’t come flying out the sides.
    The reflection of the camera flash in the metal bowl makes the skins of the garlic look shiny, but they haven't been peeled yet.  That comes next...

    The reflection of the camera flash in the metal bowl makes the skins of the garlic look shiny, but they haven’t been peeled yet. That comes next…

    The bowls don't have to be the same size.  In fact, having the smaller bowl fit into the larger bowl made it easier for me to hold on to them both while I shook their skins off.  Just be sure that both bowls are metal, or this won't work.

    The bowls don’t have to be the same size. In fact, having the smaller bowl fit into the larger bowl made it easier for me to hold on to them both while I shook their skins off. Just be sure that both bowls are metal, or this won’t work.

  3. Shake the bowls hard for a good 15 seconds, then open them up to see if you need to shake them some more. This is a great task for little kitchen helpers, but gauge your child’s skill level. You know what s/he is capable of, and what could create a lovely mess. Little Man is not quite ready for this task, but he’s getting there.  After being shaken for 15 seconds or so the garlic should have bashed itself right out of the skins. If any are still clothed, simply pull off the skins, since they are likely cracked and easy to peel.
    Oh yeah...  After a good 15 seconds of shaking the cloves literally fell out of their skins.  Two weren't completely undressed yet, but I just needed to pull off the already cracked skin and they were done.

    Oh yeah… After a good 15 seconds of shaking the cloves literally fell out of their skins. Two weren’t completely undressed yet, but I just needed to pull off the already cracked skin and they were done.

    Your fingers still get a bit sticky removing the cloves from the pile of skins, but when trying to peel an entire head of garlic... I've never had it go so quickly and with so little mess.

    Your fingers still get a bit sticky removing the cloves from the pile of skins, but when trying to peel an entire head of garlic… I’ve never had it go so quickly and with so little mess.

  4. Cut the cloves in half the long way and place them in a small sauce pan, just large enough to hold them and 2 cups of olive oil. Pour the olive oil over the sliced cloves and heat the mixture over medium heat until it just starts to bubble. Cook the garlic in the oil for 10 minutes. If the garlic begins to brown quickly, carefully remove the pan from the heat and let it cool briefly before returning it to the stove. Monitor it regularly to make sure nothing is burning. After 10 minutes carefully remove the pan from the heat, cover it and let the garlic steep in the oil for one hour.
    I halved the garlic cloves since I greedily want as much garlic flavor in the oil as I can.  If you want a milder flavor, then omit that step.

    I halved the garlic cloves since I greedily want as much garlic flavor in the oil as I can. If you want a milder flavor, then omit that step.

    The garlic cloves in the bath before heating.

    The garlic cloves in the bath before heating.

    The garlic should just start to bubble in the oil over medium heat.  If it starts to brown too quickly, carefully remove it from the heat for a minute or two and then put it back on.  No burnt garlic here, please, or your whole batch will taste burnt.

    The garlic should just start to bubble in the oil over medium heat. If it starts to brown too quickly, carefully remove it from the heat for a minute or two and then put it back on. No burnt garlic here, please, or your whole batch will taste burnt.

    This is the garlic after 10 minutes simmering in the oil.  They are lightly brown all over, but still look like they have some moisture left inside.  Take them off the heat, cover them, and let them steep.

    This is the garlic after 10 minutes simmering in the oil. They are lightly brown all over, but still look like they have some moisture left inside. Take them off the heat, cover them, and let them steep.

    This is the garlic after steeping in the oil and cooling to room temperature for an hour.  Most of the moisture is gone, and they've given all of their awesome garlic-iness to the oil.  Spell check doesn't like that one.

    This is the garlic after steeping in the oil and cooling to room temperature for an hour. Most of the moisture is gone, and they’ve given all of their awesome garlic-iness to the oil. Spell check doesn’t like that one.

  5. Once it has cooled to room temperature, pour the oil through a strainer into a clean glass jar with a lid. The oil can be used immediately, or it can be stored in the refrigerator in a glass jar for up to a week. If you think that you won’t use two cups of oil over the course of a week, simply cut the quantity of oil in half and make the same thing with 1 cup of oil.
    I didn't want to spill the oil as I strained it into the glass jar, so first strained it into my measuring glass that had held the olive oil for this recipe.  Then I poured from the spout of the measuring glass into my storage jar.

    I didn’t want to spill the oil as I strained it into the glass jar, so first strained it into my measuring glass that had held the olive oil for this recipe. Then I poured from the spout of the measuring glass into my storage jar.

    Lovely dessicated garlic and beautifully infused garlic olive oil.

    Lovely dessicated garlic and beautifully infused garlic olive oil.

    With a tight fitting lid this garlic infused olive oil will last for up to one week in the refrigerator.  I already have many plans for my oil, including a low FODMAP garlic bread, so stay tuned.

    With a tight fitting lid this garlic infused olive oil will last for up to one week in the refrigerator. I already have many plans for my oil, including a low FODMAP garlic bread, so stay tuned.

Click here for a printable version of the Garlic Infused Olive Oil recipe.

P.S.

Since originally writing this blog post (it sat around a bit until I could take the pictures) we have found that as restrictive as it is, the low FODMAP diet has had a tremendously positive effect on Little Man.  We are looking forward to being able to try reintroducing some of the high FODMAP foods back into his diet eventually, but for now the sacrifice of the dietary change has been well worth it.

Mini Chocolate Cupcakes

Someone once read me a quote that describes time as a whirlwind, swirling faster as you move away from the center out towards the edges.  Time moves slowest at the center of the whirlwind and this is full of people trying desperately to slow down or hold onto time, mostly young lovers and the parents of young children.  As Little Man turns four both Dave and I find ourselves manically flip-flopping between being excited for what this new year will bring (aka let’s please get out of the threes… please…) and sappy nostalgia for the baby that Little Man used to be.  Sob!

Right now the excitement for four is winning out, and I can’t wait to see what this new year will bring.  To start his fourth year out right we wanted Little Man to be able to bring a special dessert to his day care, but still have it be something we can feel good about him eating.  I haven’t written about it yet, but much of last year has been a struggle to figure out if Little Man is dairy/lactose intolerant or not.  Many of the recipes that I have been working on recently are dairy-free versions of family favorites.  In many cases I’ve been able to simply swap out cow’s milk for almond or coconut milk.  In a few examples, the transition hasn’t been that easy.  The main thing for this birthday treat, however, was that we wanted it to be something that Little Man would be hugely excited for and that he and his “classmates” would have no idea that the treat they were eating was good for them (or at least not as bad as the refined flour and white sugar versions can be).

These mini muffin/cup cakes are delicious treats on their own.

These mini muffin/cup cakes are delicious treats on their own.

Last year Little Man and I brought mini-muffin sized versions of my Banana Chocolate Muffins, which were also one of my first posted recipes for this site (more nostalgia…).  This year I wanted to bring it up a notch and make it more cupcakey.  The first step was to revamp my previous recipe making it nearly dairy-free.  I say “nearly dairy free” since it does have semisweet chocolate chips and those contain milk.  If you want truly dairy free you can simply omit the chocolate chips, or use a dairy-free/vegan alternative.  I haven’t found one that I’m happy with yet, so standard semi-sweet chocolate chips won out.  These muffins, mini or otherwise, are delicious on their own and are treats that I feel good about Little Man eating.

But what really sets these mini muffin/cupcakes apart is the frosting.  Oh, the frosting…  This frosting is the first thing that I’ve every come across that deserves the phrase “stupid good!”  It’s amazing.  Four ingredients.  30 second to whip it up.  The hardest thing is not devouring the entire bowl before frosting your cupcakes or cake.  Seriously… This stuff is ridiculous, and I cannot take a single iota of credit for it.  The frosting recipe comes from an amazing blog called Chocolate Covered Katie.  I’ve included a link to the Vegan Chocolate Frosting Shots here, as well as in the main recipe below.  For Dave and I, we were happy leaving it just barely sweetened with a little powdered sugar, but for the kiddos I added probably about 1/2 cup total of powdered sugar to take the edge off of the bittersweet chocolate goodness that this creates.  This “frosting” could be served as a chocolate mousse in a fancy coupe and no one would be the wiser.  Seriously, it’s that good.  I doubled the recipe to make enough frosting to cover these cupcakes.

My sous chef had a great time playing "baker," though it took a bit of persuasion to convince him that wearing an apron was a good idea.

My sous chef had a great time playing “baker,” though it took a bit of persuasion to convince him that wearing an apron was a good idea.

OK, back to the awesome cupcakes…  Since these cupcakes were for Little Man’s day care buddies, it only seemed fitting that he help me make them.  You’ll notice that in the pictures from this recipe are, shall we say… a bit more messy than usual.  They often have ingredients all over the counter, with Little Man’s grubby mits sticking out of the bowl at any given time.  We had a blast.  While I “controlled” the situation enough to make sure that the end product was delicious, I wanted this to be super fun for Little Man.  He got to taste the ingredients and saw that flour did not taste good good, while brown sugar was quite tasty.  I measured, he dumped, and a good time was had by all.  By the time we were spooning batter into the muffin cups, he was pretty done with the whole procedure, but that was fine since the motor skills of filling little muffin cups cleanly is still a bit beyond him.

In terms of planning, I made the cup cakes two days in advance, the frosting the night before, and then frosted and decorated the cakes in the morning before day care.  You can certainly frost them the night before, but you would need to either leave them uncovered in the refrigerator or keep them in a container that does not touch their tops.  The frosting stays soft to the touch, so plastic wrap won’t be an option.  Your hardest hurdle to clear will be not gobbling them up before sending them off to school.

Little Man got to help sprinkle the baby planets over the frosted cup cakes.

Little Man got to help sprinkle the baby planets over the frosted cup cakes.

Mini Chocolate Cupcakes (Dairy Free)
Ingredients
:
4 very ripe bananas
¼ cup canola oil
¼ cup silken tofu
2 eggs
½ cup brown sugar
1 cup all-purpose flour
½ cup whole wheat flour
3 Tbsp. cocoa powder
1 tsp. baking powder
1 tsp. baking soda
¾ cup semisweet chocolate chips (optional)

Directions:

  1. Preheat oven to 400ºF and line a mini muffin pan with paper liners. A regular muffin pan can be used, but the cupcakes will spread out a bit rather than growing tall.

    I don't own a mini muffin pan, so we simply used a regular sized pan with mini muffin cup papers.  Little Man had a blast dropping single cups into each hole in the pan.  Of course this task was made more fun with a generous mug of Auntie Erin's Hot Cocoa, hence the straw in the photo.

    I don’t own a mini muffin pan, so we simply used a regular sized pan with mini muffin cup papers. Little Man had a blast dropping single cups into each hole in the pan. Of course this task was made more fun with a generous mug of Auntie Erin’s Hot Cocoa, hence the straw in the photo.

  2. In a large bowl add the bananas, oil, tofu, eggs and brown sugar. Beat them on medium high with electric beaters (or a stand mixer) until well combined. There may still be tiny flecks of tofu sprinkled throughout, but that’s fine. It will melt right in.
    Wet "more or less" ingredients.

    Wet “more or less” ingredients.

    Not the most photogenic image, but no matter how fast I whisked I couldn't get the tofu to incorporate like I wanted it to.  So I switched to the electric beaters, and they did the job.

    Not the most photogenic image, but no matter how fast I whisked I couldn’t get the tofu to incorporate like I wanted it to. So I switched to the electric beaters, and they did the job.

  3. In a medium bowl add the flours, cocoa powder, baking powder and baking soda. Whisk the ingredients together to combine.

    Dry ingredients, mostly in the bowl.

    Dry ingredients, mostly in the bowl.

  4. Gently add the dry ingredients to the wet, being careful to not over mix the batter. Fold in the chocolate chips if using.

    The rich, chocolate batter.  Make it truly dairy free by omitting the chocolate chips or using a vegan substitute.

    The rich, chocolate batter. Make it truly dairy free by omitting the chocolate chips or using a vegan substitute.

  5. Spoon a couple of teaspoons of batter into the prepared muffin pans.

    This was Little Man's pan that he filled.  If I had a small cookie scoop for this, it might have been easier for him.  As it was, the two teaspoons were a fun, artistic adventure.

    This was Little Man’s pan that he filled. If I had a small cookie scoop for this, it might have been easier for him. As it was, the two teaspoons were a fun, artistic adventure.

  6. Bake for 15-20 minutes. Cool completely on a wire rack.

    Once on they were on the rack, it became difficult to to convince Little Man that they weren't there as immediate snack treats.

    Once on they were on the rack, it became difficult to to convince Little Man that they weren’t there as immediate snack treats.

  7. Decorations: Frost the cupcakes with Vegan Chocolate Frosting, then decorate as whimsy dictates. Sprinkles are always fun, or you could use sugared flowers for an upscale look. Little Man’s birthday party this year is space-themed, so he chose tiny sphere sprinkles since they look like “baby planets.”

Click here for a printable version of the Mini Chocolate Cupcakes (Dairy Free) recipe.

Now we're talking...

Now we’re talking…


The Tyranny of Cucumbers

“Did you ever think in your life that you would have made so many pickles?”

Dave recently asked me this at 1am in the morning as we were wrapping up a marathon pickling session.  I gave one of those chuckles that comes from pure exhaustion and set the timer for the processing of the last four jars of cured pickles.  The answer to Dave’s question was a resounding “no” not in a million years would I have ever thought that I’d have made any pickles, forget about the 40 some odd liters… yes liters… of pickles I’d made over the last few weeks.

When the lady farmer landlord asked if I’d be interested in making pickles, I’d jumped at the chance.  Almost literally.  Then I realized how many cucumbers one healthy plant can produce, forget about the fact that the cucumber bed at the farm has 7-8 hills of cucumbers, each hill housing 2-3 vines.  Oh my…

If you’ve ever seen cucumbers grow, you would know that they are ninja vegetables.  Their camouflage is so perfect they put invisibility cloaks to shame.  The lady farmer landlord and myself and Dave and Little Man would comb over a vine, plucking any cucumbers we would find.  Little Man’s contribution is a bit quesitonable here.  It mainly consists of him dropping an action figure into the plant accompanied by much “argh, I’m faaaaaalllllliiiing…” and then demands that his figure be saved.  We would pick it all, from the tiny pinky finge- sized cukes to the fat field cucumbers that are too big to be whole pickes, but would make good relish or pickle slices.  I state that all 3-4 of us were combing through each fine, picking everything, and 15 minutes later we’d see the vine from a different angle and find 3 more cukes hiding there.  Then the next morning when I’d be watering the garden I’d see more smirking at me from under the leaves.

We’ve now put a kaybash on picking cucumbers for pickling.  Anything else can be done with them, eat them raw with a little vinegar, make a delicious cold soup or dip (for a cold cucumber yogurt soup, check out my Turkish Cucumber and Yogurt Soup (aka Cacik) recipe), slice them with fresh tomatoes and drizzle them with a little olive oil and balsalmic vinegar for a sliced salad, and the list goes on.  You can make jewelry with them for all I care, just don’t ask me to make more pickles…  please…  🙂

Grape leaves for keeping pickles crisp.

Grape leaves for keeping pickles crisp.

Kosher-Style Dill Pickles

One of the biggest hurdles to deal with in making pickles is how to keep something submerged in water crisp.  One way is to use a fresh grape leaf in each jar.  Grape leaves contain alum, which helps to keep the pickles crisp.  Also, the blossom end of the cucumbers contains and enzyme that softens pickles.  So trim off a little of both ends of the cucumbers to make sure that those enzymes are removed.  Now get pickling!

Ingredients
8 lbs. small pickling cucumbers (such as Kirby)
1 cup pickling or kosher salt
3 tbsp. pickling spice
9 cups water
7 ¾ cups white vinegar
7 small, fresh grape leaves
7 bay leaves
7 garlic cloves, peeled and halved
7 dill sprigs and heads, halved

Directions

  1. Wash and scrub the cucumbers under running water. Trim 1/8th of an inch off of both ends of every cucumber, and then poke them all over with a fork.
    A big pile of cucumbers waiting to be pickles.

    A big pile of cucumbers waiting to be pickles.

    Poking holes to aid in curing the cucumbers.

    Poking holes to aid in curing the cucumbers.

  2. In a large, non-reactive bowl create four layers of cucumbers each one topped with ¼ cup of the kosher salt. Once the layers are completed, fill the bowl with cold water to submerge the cucumbers by ¼ inch. Use a plate to weigh down the cucumbers, and let them sit for 12 to 24 hours.
    A first layer of cucumbers.

    A first layer of cucumbers.

    A layer of kosher salt.

    A layer of kosher salt.

    The final of four layers of cucumbers and salt.

    The final of four layers of cucumbers and salt.

    The cured cucumbers after soaking in the salted water for 24 hours.

    The cured cucumbers after soaking in the salted water for 24 hours.

  3. Prepare your canner (or large stock pot), jars and lids.
  4. Drain, rinse and drain the cucumbers again.
  5. Wrap the pickling spice in a double thickness of cheese cloth and tie it securely. In a large pot combine the packet of pickling spice, water and vinegar. Bring the mixture to a boil and continue at a hard boil for one minute. Discard the packet of pickling spice, and keep the brine hot.
  6. Working with one jar at a time place one grape leaf, one bay leaf, one half of a garlic clove, and one half of a dill head at the bottom of the jar. Pack the jar tightly with cucumbers. Place one half of a garlic clove and one half of a dill head on top of the cucumbers. Pour in the hot pickling liquid leaving ½ inch head space. Remove air bubbles and add more pickling liquid if necessary. Wipe the rim and place a hot lid disk on the jar. Skrew down the band to fingertip-tight.
  7. Place jars in the canner and return to a boil. Process for 15 minutes. Turn off the heat, remove the canner lid and let the jars sit in the hot water for another 5 minutes. Carefully remove the jars from the hot water and place them without tipping on a towel-lined counter top. Let the jars stand for 24 hours, then check the lids to be sure they are all sealed. Any jar that is not sealed can be stored in the refrigerator for up to three weeks. Jars with good seals can be cleaned and stored. If any pickles protrude above the brine in their jars, simply turn the jars over weekly in storage to keep the different ends from drying out. Enjoy!
    20140731_155425

Click here for a printable version of the Kosher Style Dill Pickles recipe.


Date Night

The semester began and I don’t think we’ve stopped running yet.  I can’t wait to carve out the time (and energy) to share some of the ideas and dishes that I’ve been working on,

Anniversary Date Night

Anniversary Date Night

To begin, I can’t believe that Dave and I just celebrated our 9th Wedding Anniversary!  Our actual anniversary fell in the middle of the week, so we did our big date night on the Friday night.  On the “real” night we had a great dinner at home of Chicken Taco Casserole, but to start I made an amuse buche that we’d had at our wedding.

Date Night Dates

Date Night Dates

These Date Night dates are a simple combination of a whole pitted date stuffed with walnuts and Parmesan cheese.  If you have it in your budget, these are superlative if done with mejdool dates.  Our budget didn’t quite run that deep, so instead I used whole pitted dates from the bulk bins at our local supermarket and they tasted fantastic.

Date Night Dates

Ingredients

8 whole pitted dates
8 whole or 16 halved walnuts, no shell
8 shards of Parmesan cheese

Directions

  1. With a small, sharp knife cut an opening slit into the top of each date.
  2. Depending on the size of the dates, insert a whole or half walnut into each.
  3. Insert a shard of Parmesan into each date.
  4. Serve on a nice plate with fancy beverage of choice. Enjoy!

Click here for a printable version of the Date Night Dates recipe.

Amuse Buche

Here’s to more amazing memories!  Love ya, Dave!

A Tale of Two Parties: Utica Tomato Pie

Where to begin with Utica Pie…

Utica PieMy best friend in graduate school would speak about this thing called Tomato Pie in reverent tones and I was so excited to try it when she brought me to her house for my first Easter in New York.  Then I saw this under-dressed, plain, fluffy crust with just a little sauce and cheese, and was completely underwhelmed.  Jen’s face, on the other hand, lit up and she edged a bit closer to the plate.  I took a piece, not wanting to seem rude, and took a bite of what I only expected to be relatively tasteless cheese pizza… and was immediately hooked.  The crust had great texture, crispy on the bottom and fluffy but flavorful throughout.  It only needed a little of the intense sauce and cheese to round out the flavor profile, any more and it would have been cloying.  In future trips to what I would claim as my New York home, one of the things I always looked forward to was to be sent home with extra Tomato Pie… and Roma Bacon, but that’s a different story.

I have to say that as I am posting these recipes I am faced with a trepidation that I didn’t feel when making them for our party guests.  None of the guests at our party have every been to upstate New York, so I could have served up just about anything and stated that it was from upstate and no one would have been the wiser.  Now, however, I know that some of my readers are from upstate and they know what these things are supposed to look like and taste like.  I, however, am making these from memories and partial recipes that I’m piecing together as I go.  The final dishes that result from these recipes are delicious, but it is possible that some of my tweaks in the kitchen may have pulled them away from the real deal dishes.  For my family in New York, I hope you can look past any inaccuracies and just taste the love, since they were made with memories of all the love I experienced when in your homes.  Miss you!

Utica Pie
Adapted in part from Cook’s Illustrated Chicago-Style Deep Dish Pizza
Ingredients: Makes 2 pies
For the Crust:
3 ¼ cups flour
½ cup cornmeal
1 ½ tsp. salt
2 tsp. sugar
1 pkg (2 ¼ tsp.) instant yeast
1 ¼ cups water (room temperature)
7 tbsp. butter, divided
4+ tbsp. olive oil, divided

For the Sauce and Toppings:
3 tbsp. olive oil
3 cloves garlic, crushed
1 28 oz. can crushed tomatoes
1 tsp. dried oregano
1 tsp. dried basil
1 tsp. dried thyme
Salt and pepper to taste
1 ½ cups freshly grated parmesan

The wet and dry ingredients for the crust.

The wet and dry ingredients for the crust.

Directions:
For the Crust:

  1. Melt 3 tbsp. of the butter and set it aside. Mix all of the dry ingredients together in a stand mixer with a dough hook. Add the water and melted butter, and mix on low speed until ingredients are combined. Then switch to medium speed (speed 2 on most models) and knead until smooth and glossy, about 4-6 minutes. Alternatively you can mix and knead the dough by hand.
  2. Shape the dough into a ball and roll it in a little olive oil in a large bowl so it’s coated with oil all around. Cover the bowl loosely with plastic wrap and a towel and set it aside to rise for 45-60 minutes.
  3. Soften the remaining 4 tbsp. butter and set aside. Turn the risen dough out onto a floured surface and shape it into a 12 x 15 inch rectangle. Using an offset spatula spread the softened butter over the dough’s surface leaving a ½ inch border free around the edges.
    Rolling the dough out into a large rectangle.

    Rolling the dough out into a large rectangle.

    Coating the top of the dough with a thin layer of softened butter will result in crispy, buttery layers of dough in the final pie.

    Coating the top of the dough with a thin layer of softened butter will result in crispy, buttery layers of dough in the final pie.

  4. Starting at a short end roll the dough up into a cylinder. Place the cylinder seam side down and roll it out into a 4 x 18 inch rectangle. Cut the rectangle in half crosswise. Set one half aside and work with one at a time.
    The dough cylinder.

    The dough cylinder.

    The long, thin cylinder, encapsulating lovely layers of butter.

    The long, thin cylinder, encapsulating lovely layers of butter.

    Divide the cylinder in half crosswise.

    Divide the cylinder in half crosswise.

  5. Fold the rectangle into thirds. Then pinch the edges of the dough together forming a ball. Repeat with the second piece of dough. Place the balls back into the oiled bowl, covering them with plastic wrap and placing the bowl in the refrigerator to rise for 40-50 minutes, or until doubled in size.
    Folding the two halves into thirds.

    Folding the two halves into thirds.

    The folded dough is then rolled and pinched into a ball.

    The folded dough is then rolled and pinched into a ball.

    One dough ball ready to become a Utica Pie.

    One dough ball ready to become a Utica Pie.

  6. Coat two 9-inch pie pans with 2 tbsp. olive oil each. One at a time transfer each dough ball to your work surface and roll it out into a 13 inch circle. Move each dough circle to its respective pie tin by rolling it loosely around the rolling pin and then draping it into the pie tin. Using your fingers press the dough into the corners of the tin, forming it up the sides. At this point you can continue on making the Utica pies, or you can cover the dough thoroughly with two layers of plastic wrap and freeze them for up to four weeks.

 For the Sauce:

  1. Heat a saucepan over medium heat. Add the olive oil and garlic, sauteing until soft but not brown, about 3 minutes.

    Mmmmm.... Oil and garlic...  Who needs more?

    Mmmmm…. Oil and garlic… Who needs more?  I was making a larger batch of the sauce here, so my proportions will be much larger than your’s.  I also have a lot of this in my freezer right now.

  2. Add the tomatoes and dried herbs. Simmer until the sauce thickens, about 15-20 minutes. Be careful, this might bubble like hot lava, and if it gets on your skin it will feel like it too! Yes, this is from personal experience…

    A flavorful sauce the cooks like hot lava.  Be ware of splashes!

    A flavorful sauce the cooks like hot lava. Be ware of splashes!

  3. Taste and adjust for seasoning. Set aside to use with the crust, or refrigerate/freeze for use in the future.

Note: This sauce recipe makes more sauce than you will need for the two pies. The extra sauce can be frozen for use over the next couple of months. Try freezing it in ice cube trays so that you can defrost only the amount you need and keep the rest in the freezer.

 For the pies:

  1. Preheat the oven to 425 degrees.
  2. If using frozen dough, remove the plastic wrap and bake the crusts for 15 minutes until almost cooked through, but not yet browned. Then follow the directions as for room temperature dough.

    From frozen, this crust was baked for about 15 minutes until almost cooked through, but not browned.

    From frozen, this crust was baked for about 15 minutes until almost cooked through, but not browned.

  3. From frozen/pre-baked and room temperature dough: Spread ½ cup of sauce over the dough, then sprinkle half of the cheese over top. Repeat with the second pie.
    You should still be able to see the crust peeking through the sauce.

    You should still be able to see the crust peeking through the sauce.

    A delicious coating of parmesan cheese...  I'm lucky that Little Man was sleeping or he would have stolen the cheese from my bowl.

    A delicious coating of parmesan cheese… I’m lucky that Little Man was sleeping or he would have stolen the cheese from my bowl.

  4. Bake until the crust is golden brown and the cheese melted, about 15 minutes.
    One hot, bubbly pie.

    One hot, bubbly pie.

    And another...

    And another…

  5. Remove the pies from their tins and cut into squares. Enjoy!
Pile them high on a serving platter, and then be sure to elbow your way to the front before they disappear.

Pile them high on a serving platter, and then be sure to elbow your way to the front before they disappear.

Click here for a printable version of Utica Pie.

I hope this recipe can make converts out of you too!  🙂

Grilled Salmon, Fresh Off the Line

Until just a couple of days ago, the best salmon I have ever had was grilled up by Dave’s dad, Joe, at their cabin.  I should say that pretty much whenever Joe is grilling salmon, that’s my favorite.  It’s amazing.  That was the truth until a couple days ago when Dave grilled up some Lemon Garlic Salmon. This fish was incredibly tender, almost creamy in texture, but not mushy.  There wasn’t a hint of fishiness anywhere, and if you associate salmon with a fishy taste that probably means that you’ve been eating farm raised salmon.  Yuck.  Wild caught salmon from the Pacific Northwest has a fresh taste that has absolutely nothing in comparison to the muddy, fishy flavor of farm raised salmon.

The Lemon Garlic Salmon that Dave grilled up wasn’t just wild caught, it was caught by a cousin who just happened to be coming to our home for Dave’s graduation party (recipes from that party will be appearing next week).  This wonderful cousin, of whom poets should sing, showed up at the party with a large, red cooler.  He plunked it down in our kitchen and called Dave over.  As he lifted the white plastic lid I think I heard angels singing, because inside were two enormous sides of the most beautiful pink salmon I’ve ever seen. I had learned early in our relationship that one of the benefits of marrying a west coast Canadian boy was that this got me into closer proximity to some of the best salmon in the world.  I had no idea that this would also grant me family who showed up bearing gifts of fresh caught salmon.

We tightly wrapped and froze much of the salmon, but Dave saved out a large portion for the grill.  Then he went into research mode, trying to figure out the flavor profile he wanted.  In the end he chose a beautifully simple combination of lemon and garlic with just enough seasoning to highlight the amazing flavor of the salmon.  Dave adapted this recipe from an Essence of Emeril recipe tweaking it a bit here and there.  You could also use another firm fleshed fish like halibut or cod, but just be careful with the cooking time if you go for a smaller fish size.  The perfect accompaniments for the Lemon Salmon are the Cabin Grilled Potatoes and a fresh green salad…  especially if it is served with a glass of wine.  In true style of not wanting to let anything go to waste, we toasted the salmon with glasses of sparkling wine leftover from the graduation party that had gone slightly flat.  As luck would have it, the sparkling wine was so good that even the slightly flat version was still crisp with a slight effervescence that was amazing with the salmon.  It was a perfect meal on the deck with my two amazing boys.

Note: When Garlic Turns Blue…

The salmon smelled fantastic.  We brought the packet to the table and Dave did the big reveal, peeling the foil back, the delicious steam poured out revealing the perfectly cooked salmon layered with the beautiful golden lemons and studded with…  cyanide blue garlic?  What on earth had happened?  Was the salmon safe to eat?  And why on earth had turned the garlic turquoise blue?  A bit of quick internet research later and I learned that it is an interesting, but non-toxic, effect that sometimes happens with young garlic, especially when it comes in contact with other acids like lemon, onion or wine, and low heat.  So please enjoy the lovely turquoise hue of the garlic in our pictures and know that it tasted delicious.  If you are curious about the glories of blue-green garlic, here’s a NY Times article on the subject.

Lemon Garlic SalmonLemon Garlic Salmon
Ingredients
:
1 side of salmon, skin on
2 tsp. salt
1 ½ tsp. white pepper
2 tsp. fresh rosemary, coarsely chopped
1 lemon, thinly sliced
1 small onion, halved and thinly sliced
8 cloves garlic, minced
1/3 cup olive oil, divided

Directions:

  1. Preheat your grill or oven to 450 degrees.
  2. Rinse the salmon under cold running water and then pat dry.
  3. Lay a long piece of foil down on the work surface. The foil should be twice the length of your salmon, or use two pieces to be sure to cover your salmon completely.
  4. Butter the foil, leaving a couple inch border around the edges for sealing later on. Drizzle a little olive oil over the foil, and then lay the salmon onto the foil skin side down. Sprinkle with the salt and white pepper.
  5. In a small bowl mix the minced garlic with a little olive oil and salt, smashing the garlic against the side of the bowl with a spoon to make it a loose paste. Smear the garlic paste all over the salmon, and sprinkle the fresh rosemary over top.
  6. Layer the lemon slices over the salmon, covering as much of the surface as you can. Then sprinkle the onions over the lemon slices, and drizzle the entire packet with the remaining olive oil.
  7. Fold the foil edges up to seal the salmon tightly on all sides in the packet. Place the foil packet on the grill and monitor it closely. The salmon should steam inside the packet, retaining all the amazing moisture and flavor of the lemon, garlic and onions.
  8. Cook the salmon packet for 15-20 minutes, or until just cooked through but still moist. The cooking time will vary based on the thickness of your salmon, thinner pieces cooking faster than thicker ones.
  9. Remove the packet to a serving plate and bring it to the table to serve from the foil. If your salmon had pin bones be careful to remove them carefully as you go, warning all diners that there could be pin bones in their portion. Enjoy!

Lemon Garlic SalmonClick here for a printable version of the Lemon Garlic Salmon recipe.

Cabin Grilled PotatoesCabin Grilled Potatoes
Ingredients
:
6 medium red skinned potatoes
1 medium onion, halved
6 tbsp. butter
Salt and pepper

Directions:

  1. Preheat your grill or oven to 450 degrees.
  2. Thinly slice your potatoes and set them aside. Thinly slice your onions and set them aside.
  3. Place a baking sheet on your work station and cover it with a sheet of aluminum foil that overlaps each side by an inch or two. Generously butter the foil, leaving a couple inches of border all around for when you close the packets.
  4. Layer half of the potatoes across the foil, overlapping them slightly and leaving enough foil around the edges that the packet can be sealed for the grill or oven. Dot the potatoes with thin slices of half of the butter.
  5. Layer half of the onions over top of the potatoes, and sprinkle the entire packet with salt and pepper.
  6. Layer the remaining potatoes over the onions, and dot the potatoes with thin slices of the remaining butter.
  7. Layer the remaining onions on top of the potatoes, and sprinkle the entire packet with salt and pepper.
  8. Place a second piece of foil over top of the potatoes and onions, and fold the edges up to seal the packet on all sides.
  9. Place the packet into your grill and cook for approximately 20 minutes. Monitor the heat during the cooking, adjusting as necessary. The sealed packet will steam the potatoes, but the heat should also create a golden crust on the bottom. Be careful that the bottom layer doesn’t “over caramelize” (aka burn).
  10. Remove the packet to a serving plate and bring it to the table. Rip open the foil to let the aroma of browned buttery potatoes and onions float across the table. Serve family style. Enjoy!

Click here for a printable version of the Cabin Grilled Potatoes recipe.

Cabin Grilled Potatoes

The Long May Weekend – A Year Later

To be honest, I don’t know a lot about Queen Victoria whom the long May weekend commemorates. We still feel repercussions from the Victorian era, such as white wedding gowns and a penchant for prudery. The Queen also plays a memorable role in “The Pirates! Band Of Misfits” in which she wields a mean scimitar. I hadn’t even been aware that she had her own day in Canada until last year when I flew out to Vancouver Island on the long weekend to look for a place for our family.  I had only this one weekend and some substantial internet house browsing in which to find the home we would move to in a few short months.

Such began an epic weekend of rental house hunting with my mother-in-law, Ruth, and my sister-in-law, Erin. We would learn quickly that house hunting online is much like online dating…  Everyone lies.  The pictures are all glamor shots from years if not decades earlier, the houses all looked much cleaner online, and in the case of a couple of our visits the picture can’t quite convey the… shall we say scent… of the actual building.

We called ourselves Little Man’s Angels, an all woman team who were finally answerable to my toddler son.  Even though he was back in the States during our adventure, Little Man became our litmus test for whether or not a property was even worth considering.  Unfortunately most of the places that we visited were not viable. In fact, right after visiting one more decrepit, dirty property in a long line of decrepit, dirty properties with questionable potential for child safety I was starting to wonder if I was being too picky. I must have mumbled something positive about the house when Ruth looked me in the eye and stated that while Dave and I were welcome to live in that house, her grandson would certainly not. I almost cried from relief.

The houses we toured in the greater Nanaimo area over the course of the weekend were memorable. One was so small that it should have housed dolls, not real people. Another reeked of stale tobacco and we later learned a man had been violently killed on a nearby street a few months earlier. Another had a blind driveway that led onto a busy street, not to mention a pile of human feces on the back porch. Another had strange fabric draped from the ceiling, holes punched in the walls, and boasted that it came with an outdoor plastic play house… mind you the playhouse had been used as a chicken coop for three years, but that’s nothing that a little spray bleach can’t take care of right? Right…  The one thing that all of the properties shared was that online they looked and sounded amazing.  I started to panic about our prospects.

Then we saw the property on the farm and I think I heard angels sing as a single ray of sun broke through the clouds and lit the house.  The building itself is nice, but the biggest draw was the farm itself and the surrounding landscape.  The idea of Little Man’s first long term memories being shaped here feeding chickens, petting horses, being chased by sheep…  The three of us looked at each other and had to resist the urge to rush into a jumping group hug.

Later we would begin the pattern that would haunt us for the rest of the move.  Just as things would start to look up, something would come crashing down.  No sooner had we called to secure our rental of the farm house then the great situation fell apart almost instantly.  We almost lost the house when its occupants at the time lost the home they were bidding on, and in fact it was only a few weeks before the actual move to Canada that we learned we’d be able to move in.  Other things would happen as well, but for the purposes of this post, it wasn’t until when Dave and his dad pulled up to the house with the moving van filled with all of our belongings and pulling our car with the cats that I truly let myself believe that things would work out.

The farm house is not perfect, but it has turned out to be a great decision. Almost a year later Little Man still asks to go back to our blue house in Iowa, but I don’t think he misses the house as much as he does the proximity to his favorite zoo and his child care provider.  We’re making friends, we live in a beautiful place, and are finding favorite places that we like to go back to over and over again.

Now that we are at this Long May Weekend one year later the main thing that keeps coming to mind is gratitude.  I’m grateful for the hilarious memories from our house hunt. Grateful that Ruth and Erin were able to take the time (and insanity) of that visit with me. Grateful that we live on such a beautiful island; in such a great home; close to the sheep, pigs, Little Man’s Ladies (aka the chickens), and horses; in a place full of potential for more fantastic adventures and memories.

With the thought of gratitude in mind, I planned a simple meal for the barbeque.  My goal was for something that wouldn’t take much time, leaving more time to be with Dave and LIttle Man, but also something full of flavor that Little Man would devour without us having to focus on getting him to eat his dinner.  Thankfully I was successful.  Little Man gobbled everything up and we were all able to have a nice family dinner full of laughs and stories. It was a perfect commemoration of the House Hunt Long Weekend. I hope that one or more of these recipes can give you a similar experience with your family or friends.

Menu: Mumbai Grilled Drumsticks, Mustard Seed Rice, Simple Grilled Zucchini and Mushrooms, and Mango Lassi.

Mumbai Grilled Drumsticks

Mumbai Grilled Drumsticks
Ingredients
:
2 tbsp. Tandoori paste
¼ cup plain, fat free yogurt
3-4 garlic cloves, finely grated
2 inch fresh ginger, finely grated
1 tsp. salt
1 tsp. pepper
1 tbsp. canola oil
10 chicken drumsticks

Directions:

  1. Combine all of the ingredients except for the chicken in a large bowl.
    The marinade ingredients.

    The marinade ingredients.

    253

    The marinade ingredients combined.

    The marinade ingredients combined.

  2. Add the drumsticks to the bowl and toss until they are evenly coated. Use your hands here to really spread the marinade over the chicken.  Cover and refrigerate the chicken for at least 30 minutes or overnight.

    Tossing the chicken in the marinade is best done with your hands.  It's a bit messy, but roll up your sleeves and dive on in.

    Tossing the chicken in the marinade is best done with your hands. It’s a bit messy, but roll up your sleeves and dive on in.

  3. Preheat your grill or grill pan over medium/medium high heat. The marinade is predominately yogurt based, so you may need to grease your grill to make sure the chicken doesn’t stick. Grill the chicken over medium heat for approximately 45 minutes or until the chicken reaches an internal temperature of 165 degrees. Serve and enjoy!

Click here for a printable version of the recipe for Mumbai Grilled Drumsticks.


Mustard Seed Rice

Mustard Seed Rice
Ingredients
:
1 tbsp. brown mustard seeds
1 tbsp. canola oil
1 ½ cups white basmati rice
3 cups hot water
Salt and pepper

Directions:

  1. Gently heat the oil in a medium saucepan over medium heat and add the mustard seeds. Cover the pan when the seeds start to pop, and shake it periodically to keep the seeds moving. Be careful not to burn them. When the seeds stop popping, about 30 seconds, add the rice and stir to combine. Stir the rice every now and then to let it just start to brown. This should take just a couple of minutes.
    Sizzling the mustard seeds in the oil.  When they start popping, cover the pan to prevent a mess on your stove.

    Sizzling the mustard seeds in the oil. When they start popping, cover the pan to prevent a mess on your stove.

    Popping mustard seeds.

    Popping mustard seeds.

    Sauteing the basmati rice with the mustard seeds and oil.

    Sauteing the basmati rice with the mustard seeds and oil.

    Browning the rice.

    Browning the rice.

  2. Carefully add the hot water to the pan. The pan is already hot so it will sputter and steam when you add the water.
  3. Bring the water to a boil, reduce the heat to simmer and cover the pan. Simmer the rice for 15 minutes, and then remove it from the heat. Let the rice sit with the lid on for 5 minutes. Remove the lid and fluff the rice with a fork. Spoon the rice into a serving bowl and enjoy.

Click here for a printable version of the recipe for Mustard Seed Rice.


276Simple Grilled Zucchini and Mushrooms
Ingredients
:
1 medium zucchini, cut into 1 ½ inch thick half moons
5 cremini mushrooms, cut into pieces roughly the same size as the zucchini
1-2 tbsp. olive oil
3-4 garlic cloves
Salt and Pepper
Directions:

  1. This recipe is more a method than anything else. Use whatever vegetables that you have at hand. I chose zucchini and mushroom because they taste great with a bit of the grill’s smokiness.
  2. Combine all of the ingredients in a large bowl and toss until the vegetables are evenly coated.
  3. Skewer all of the zucchini on one or two metal skewers, leaving a little bit of room between the pieces so they can cook evenly. Set these aside on a baking sheet. Do the same with the mushrooms. Set them aside with the zucchini and drizzle any remaining marinade over them all. Let them sit for 15-20 minutes.
  4. Grill over medium to medium high heat until the vegetables start to char and are cooked through.
  5. Remove the vegetables from the skewers, being careful of the hot metal. Toss the vegetables together in a bowl and serve. Enjoy!

Click here for a printable version of the recipe for Simple Grilled Vegetables.


271Mango Lassi
Ingredients
:
2 cups plain, fat free yogurt
2 cups frozen mango pieces
1 cup milk
1 tbsp. honey

Directions:

  1. Combine all ingredients in a blender and process until smooth.
  2. Taste to see if it needs more mango or honey. Adjust seasoning, blend again, and serve. Enjoy!

Click to get a printable recipe for Mango Lassi.

Our Victoria Day bbq dinner: Mumbai Grilled Drumsticks, Mustard Seed Rice and Simple Grilled Zucchini and Mushrooms.  Little Man already made off with his Mango Lassi, so it wasn't available for a glamor shot.

Our Victoria Day bbq dinner: Mumbai Grilled Drumsticks, Mustard Seed Rice and Simple Grilled Zucchini and Mushrooms. Little Man already made off with his Mango Lassi, so it wasn’t available for a glamor shot.

A Spring Feast: Dessert

I thought I knew a lot about food when I moved from California to New York for graduate school.  I’d lived in So Cal all of my life, regularly ate food from various cultures and thought I was pretty adventuresome.  Isn’t there something about pride going before a fall?  In this case, my “fall” was going to be in falling in love with food and cooking in a way that I’d never experienced before.

I grew up loving to cook with my family; my mom and Grammie are two of the major cooking influences in my life.  Then in New York, living alone and thousands of miles away from any friends and family, I found myself turning on the TV just to have some background noise in my cramped, but empty apartment.  More often than not the channel I left it on was food TV.  This is where I started to truly learn to cook, and thankfully I also made some of the best friends of my life in New York and they also love food.

I met my best friend, my brain twin, in graduate school within the same week that I met Dave.  And have mercy on anyone in our path; we did our best to get them caught up in our own version of crazy.  Jen and I started having dinner parties on our super tight grad school budgets, trying out recipes from Bon Appetite and (the late) Gourmet magazines that we read like novels.  Soon Jen started bringing me (later Dave too) home with her for holidays to her parents’ place in upstate.  Dave and I fell in love, with each other, but also with Jen’s family.  We claimed them for our own and they’ve been stuck with us ever since.

It was at their home where I learned about true hospitality, gained an appreciation for a good Dark and Stormy, and learned (or tried) to hold my ground under severe peer pressure for one more trip back to the food line in the kitchen.  Even if you’d already been 2-3 times before, if you were lax enough to leave an empty plate in your vicinity for a moment to lean back and groan you were charged with “what, you don’t like my wife’s cooking?”  And back in line you’d go, unbuttoning the top button of your pants as you went.  We learned that the secret was to take small portions on the first round, then it wasn’t quite so painful to go back for thirds in true Hobbit fashion.

There are many recipes (or versions of them) that I learned from this household, and the one I’m sharing here today is by far the simplest but it is one that I must have every Easter (now to be joined with Aureuil’s Ham).  It is a deceptively simple, retro-style jello salad, but one that in our household now takes the place of dessert; Deb’s Jello Salad.  In fact, when I first sat down to write this post, I did so with a bowl of the leftover jello at my side.  This too, is one of those dishes that I look forward to making because I’ll have the leftovers to look forward to as well.  My only regret is that I don’t have a nice crystal bowl to showcase it in.  I can guarantee that soon I’ll be making a trip to the local thrift store to remedy that.  Then I’ll have to make this jello salad again, just to make sure that the bowl shows it off nicely, of course.

Deb’s Jello Salad
Ingredients:
2 boxes raspberry (or other flavor) jello
2 14 oz. cans of pineapple chunks,
1 cup frozen black berries or strawberries
2 bananas, sliced
1 pt. sour cream

Directions:

  1. Drain the pineapple, reserving the juice. Set aside.
  2. Mix the jello following the package directions, but substituting the reserved pineapple juice for some of the cool water.
    An inglorious beginning...

    An inglorious beginning…

  3. Put the jello in the refrigerator for 20 minutes.
  4. Add the pineapple, frozen berries and bananas to the jello. Divide the jello in half, putting half into a serving bowl and then into the refrigerator. Leave the other half on the counter so that it doesn’t set up as fast.
    The drained pineapple, frozen blackberries and sliced bananas.

    The drained pineapple, frozen blackberries and sliced bananas.

    Everyone into the pool...

    Everyone into the pool…

  5. When the refrigerated jello is set (start checking after 15 minutes or so), carefully spread the sour cream over that first layer.

    When I first tasted this jello salad, I assumed that the middle layer was sweetened cream, but no it's unsweetened sour cream.  It doesn't need any sugar since the surrounding jello and fruit takes care of that nicely.

    When I first tasted this jello salad, I assumed that the middle layer was sweetened cream, but no it’s unsweetened sour cream. It doesn’t need any sugar since the surrounding jello and fruit takes care of that nicely.

  6. Gently spoon the remaining jello on top of the sour cream layer and refrigerate until set. Enjoy!
    The fruit jewels suspended in delicious jello.

    The fruit jewels suspended in delicious jello.

    This is not the correct dish for the jello salad, but it's the best that I have on hand at the moment.  Just use your imagination for how stunning it is in a clear, cut crystal bowl.

    This is not the correct dish for the jello salad, but it’s the best that I have on hand at the moment. Just use your imagination for how stunning it is in a clear, cut crystal bowl.

Click here for a printable version of Deb’s Jello Salad.